Once a week in a clockwise direction, wind the clock gradually until the key comes to a stop.
Hand Setting
The minute hand should only be moved forwards and NEVER backwards.
Regulation (Time Keeping/Running Speed)
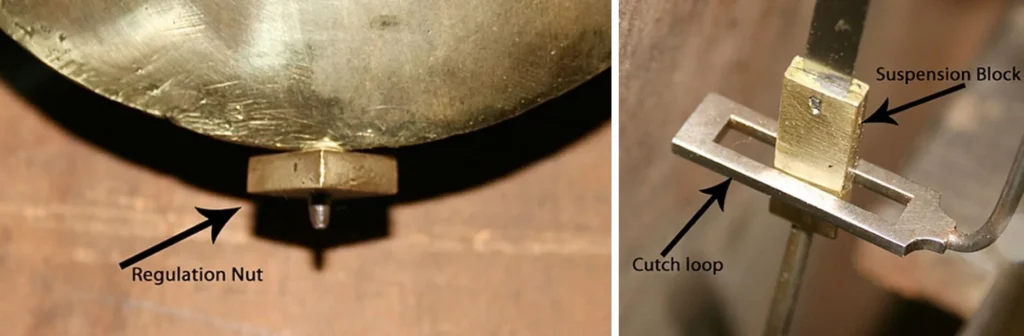
This is done by the nut on the bottom of the pendulum. Often at the pendulum bob is a collar with a V notch in it, if it has one make sure the bob is always sitting correctly in the notch. If there are two nuts under this, then one is used to tighten the bottom nut against it. Turn the nut to the right (clockwise) to go faster and to the left (anti clockwise) to go slower. The shorter a pendulum is the faster the clock goes. To slow a clock down, make the pendulum longer by adjusting the ‘rating’ nut below the pendulum. Just one revolution in the required direction per day and always reset the hands to time. Patience is required to achieve results, do not rush the process.
Putting your clock into beat (even tick)
This must be even in order that the clock continues to function. Swing the pendulum gently and listen – if you are not sure whether it is even or not try moving one side of the case to the left by pivoting on its mounting slightly and listen to see what that sounds like. If the tick sounds more uneven stop and move to the right. Moving the clock a millimetre or two can make the difference to your clock running and ticking evenly or not. Some clocks swing to the side when the door is open to wind, it helps putting blue tack at the rear of the clock case to hold it steady and stop it slipping. This also helps when putting into beat, you can slide the clock to the correct position and hold in place by bedding in the blue tack.
Maintenance
To maintain the clock you should have it checked and serviced every 4-5 years. Do not attempt to oil a clock yourself. This should be done by a qualified repairer. Over-oiling a clock can affect the running and condition of the clock.
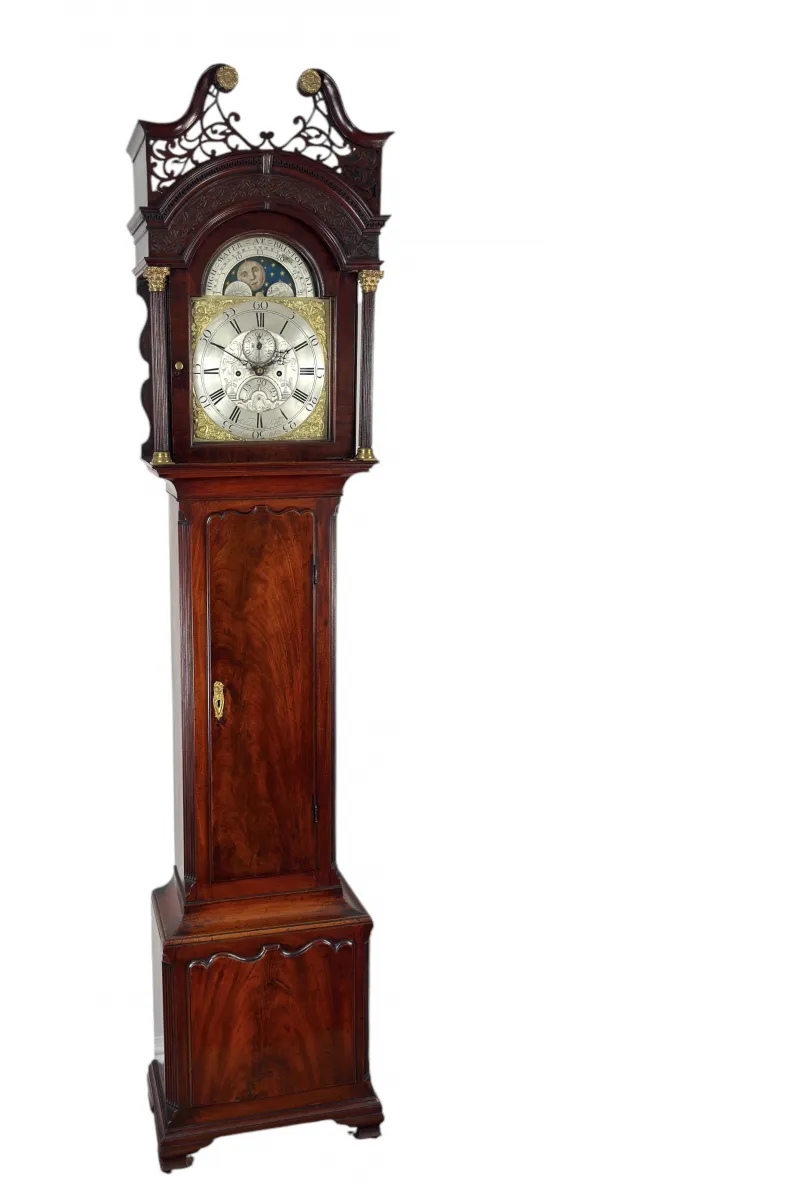
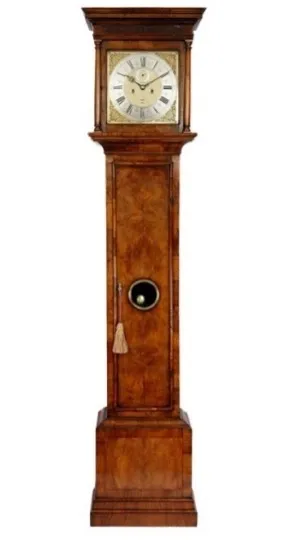
Firstly your longcase/grandfather clock should have five components. Two weights, one pendulum, one movement, one trunk and one hood. To begin with you will need to decide where the clock will be situated. This can obviously be anywhere in your house but you will need to be careful when placing them near radiators or other sources of heat due to the possibility of damage to the case. Also placing them near a bedroom may cause problems but if the clock has a Strike/Silent facility then the strike can be turned off. The majority of London longcase/grandfather clocks have the Strike/Silent function but this can also be found on many provincial longcase/grandfather clocks.
Trunk of the Clock…
The first job is to place the trunk of the clock against the wall. Using a level make sure the clock is straight. This is not absolutely necessary to make the clock work properly as the clock can be adjusted later in the set-up process but the clock must be straight to the eye. You may need to use the small wooden packs to level the clock under the front corners of the trunk. Depending on the clock or floor you may need to use more packs on one side than the other.
Great Care…
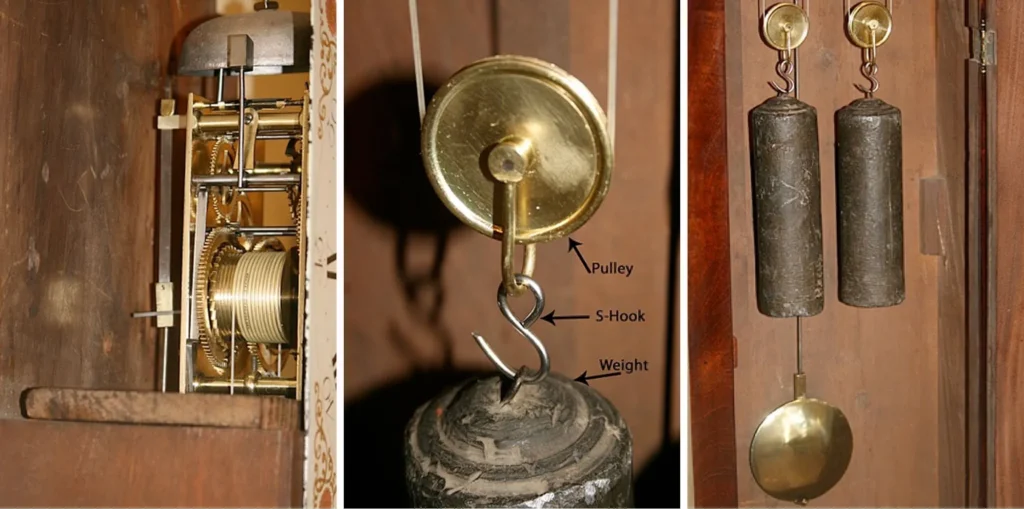
Once this is done you may then place the movement onto the cheeks of the case making sure that the brass pulleys attached to the barrel line are hanging freely into the case. Great care needs to be taken when doing this as some longcase/grandfather clock movements can be quite unsteady. You may need some assistance if you are on your own at this point. One person can hold the movement whilst the other can pick up the pendulum and lower it into the case. The pendulum will then need to be threaded up towards the bottom of the movement, through the loop of the crutch and finally onto the back cock of the movement. Now the pendulum is on the movement it should be safe to let go as the weight of the pendulum will hold the movement.
Five Components…
Once the movement is safely positioned and the pendulum is keeping it in position you can then slide the hood onto the trunk. This is done by lining up the wooden rails on the trunk with the rails on the inside of the hood. Push the hood as far as it will go so when you run your finger along the bottom moulding that sits against the moulding of the trunk there should be no gaps. If there is a gap you may need to move the movement back. You can do this by reaching up inside the case and adjusting the seatboard as you need to.
Remove the Hood…
Once you have the dial in a central position behind the masking of the hood you can then remove the hood.
Hang the Weights on the Pulleys…
When the movement is all screwed down and perfectly secure you can then hang the weights on the pulleys. If the gut on each barrel has been allowed to run down then you can insert a winding key into one of the winding holes on the dial. Holding the gut quite tightly wind in a clockwise direction. As you wind you should be able to look round the side of the movement to make sure that the gut is successfully winding itself around the barrel.
Great care needs to be taken here that the gut doesn’t jump off the barrel and start winding itself around the actual winding arbour which is in between the barrel and the front plate of the movement. If this does happen the whole movement may need to be dismantled to solve the problem. Once you have the pulley at a suitable height and the gut is around the pulley, take one of the weights and hang it onto the hook at the bottom. Some pulleys have hooks and others just have a loop. Its normal practice to hang the heaviest weight on the striking side which is the left side on an antique longcase/grandfather clock but occasionally there is an exception to this rule.
Now you have your longcase/grandfather clock completely set up and everything in the correct position you can see whether the pendulum will swing without touching the backboard. You will also need to check whether it clears the weights.
Compensate for the Skirting Board…
You will almost certainly need to put either a thin or thick block behind the clock to compensate for the skirting board. This will also solve the problem of the pendulum touching the backboard. Once you have chosen your block you can then select an existing hole in the backboard to use for fixing it to the wall. Mark through the hole onto the wall with a pencil or small screw driver.
If you are screwing the case to the wall you will need to remove the whole clock but obviously in reverse order to the process above. So you don’t need to let the gut down you can place some masking tape over the barrels to keep the gut on the barrels after you take the weights off.
There are two ways of fixing the block to the wall…
You can either screw straight through into the wall or you can fix the block to the wall with two screws and then screw the case to the block. Both methods will make the clock very stable. If the floor surface is quite slippery you may need to secure the case with two blocks, one at the top and one at the bottom.
Re-assemble the whole clock when you are happy with the wall fixing and then swing the pendulum.
Listen to the tick…
If the tick is uneven then you will need to adjust the crutch to obtain an “In Beat” tick. Holding the pendulum bob in a central position move the bob to the right and then back to the left. If the longest gap is when the bob is swinging to the right then the crutch needs to be bent to the left and if the longest gap is when the bob is swinging to the left then the crutch needs to be bent to the right. With small adjustments on both sides you should obtain an even tick. If the tick is uneven the clock will usually stop. It’s also important to make sure that the suspension block is in a central position within the crutch loop. Bending the crutch either forward or backwards will solve this problem.
Your longcase/grandfather clock should now be ticking…
To put the clock to the correct time you should always move the minute hand in a clockwise direction until you reach your current time. You must allow the clock to strike as you come to each hour or striking problems may arise. One of the main rules for antique longcase/grandfather clocks is never to turn the hands backwards. This can result in damaging the movement and it will probably need to be repaired.
The date will also need to be adjusted if the clock has one. This can usually be done from the front of the dial by moving the date ring or disc to the correct date. If there is resistance then the date is currently in gear and you will have to take the clock forward in time to ascertain when the date changes. The dates on longcase/grandfather clocks change either every 12 hours (half a day) or they change once every 24 hours. You can also change the date by removing the hood and locating the disc or ring behind the dial.
You may need to regulate the clock over the next few hours or days…
To do this you adjust the Regulation Nut at the bottom of the pendulum. If you turn the nut to the right you will speed up the clock and if you turn it to the left you will slow down the clock.
The last process of the setup is winding the clock up. As before place the winding key into one of the winding holes and wind in a clockwise direction. As you do this it’s advisable to have the trunk door open so you can see the weights as they travel upwards into the case. As you approach the top slow the winding down and you will feel the brass pulley touch the bottom of the seatboard.
Your longcase/grandfather clock is now fully assembled.
The above procedure may be quite lengthy but it’s actually quite a simple process.
Winding the clock should only be done with the key provided with your clock or a good fitting replacement, gently place the end of the key against the square arbour and turn the key several turns until you feel a resistance. Nearly all carriage clocks that wind from the back wind anti clockwise, there are usually arrows on the movement around the arbours showing direction. After winding the clock, the clock mechanism should start to tick. However, sometimes the mechanism will require starting manually. Should this occur, lift the clock with the brass handle and gently turn the clock from left to right and it should start.
Setting Hands
To set the clock, most carriage clocks have a hand setting arbour located in the middle of the back plate. Place the rear end of the winding key over the arbour and move the hands gently round the clock to the correct time. If you have a striking carriage clock, make sure that when you turn the hands allow each hourly strike to finish its sequence to avoid the strike mechanism jamming. If the hands lock do not force them. Turn the hands back a minute or so only and allow the chime to finish and then gently move the hands on. Please remember that the hands should not be turned back more than 3 to 4 minutes as this will damage the levers that trigger the strike mechanism.
Regulation
Within a few days you should notice how well the clock is keeping time. If the clock is going too fast or too slow you can adjust the timekeeping by moving the regulator. This is usually a thin steel lever which is found at the top of the mechanism and normally extends to the rear of the clock. Either on the back plate of the clock or on the platform escapement you should see the letters F or S (this represents fast or slow). Should the clock gain time, move the steel lever to S (slow) or if it is slow turn it to F (fast). The adjustment of the regulator should be done in very small movements. For adjusting the clock by 1 minute a day move the regulator half a millimetre at a time. We would suggest that you make a small adjustment and then leave it for a day or two to see how much it has lost or gained before making another adjustment.
Maintenance
To maintain the clock you should have it checked and serviced every 4-5 years. Do not attempt to oil a clock yourself. This should be done by a qualified repairer. Over-oiling a clock can affect the running and condition of the clock.
Most 8 day longcase clocks need to be wound once a week. If you have a weight-driven clock, check the cable or line is not tangled and is properly seated in the groove in the pulley. Generally, the heaviest weight goes on the right side, the next heaviest weight on the left, and the lightest one in the centre. Many clocks use similar weights on the left or left and centre. Always put the heaviest weight on the right.
When winding a weight-driven clock, turn the key slowly to raise the weight. Make sure the cable doesn’t tangle and stop winding just before the pulley at the top of the weight moves out of sight.
When winding a spring-driven clock, turn each winding point until it is tight, and you can feel that it’s at the end of its travel. If you stop short of a full wind, the clock may stop running or chiming before it should.
When winding a 30 Hr clock with chain or rope, these clocks usually have one large weight, the chain or rope is one continuous loop. The furthest section of chain or rope on the right is pulled down to lift the weight. 30 Hr clocks should be would once a day.
Setting the Time
When setting the time on an antique clock, you should move only the minute hand forward, stopping at each hour and half-hour to allow it to strike before advancing it to the next half-hour. If it has a quarter-hour chime, you should also pause at the quarter-hour points to allow the chime to complete its cycle.
Adjusting the Strike or Chime
If you feel the sound of the strike or chime is not right, you can adjust it simply by bending the arm on the strike hammers to bring the hammer head closer or further away from the rod or bell. Usually, you should have about 1/4″ clearance when the hammer is at rest, so that it bounces away after striking the bell or rod, leaving it clear to resonate. Obviously, the harder the hammer hits, the louder the sound.
Putting A Longcase/Grandfather Clock in Beat
Listen to the tick if the tick is uneven then you will need to adjust the crutch to obtain an “In Beat” tick. Holding the pendulum bob in a central position move the bob to the right and then back to the left. If the longest gap is when the bob is swinging to the right then the crutch needs to be bent to the left and if the longest gap is when the bob is swinging to the left then the crutch needs to be bent to the right. With small adjustments on both sides you should obtain an even tick. If the tick is uneven the clock will usually stop. It’s also important to make sure that the suspension block is in a central position within the crutch loop. Bending the crutch either forward or backwards will solve this problem crutch shown below.
Regulating Your Longcase/Grandfather Clock For Running Speed
To do this you adjust the regulation nut which is at the bottom of the pendulum. If you turn the nut to the right you will speed up the clock and if you turn it to the left you will slow down the clock. You should hold the pendulum shaft with one hand with a little downward pressure and adjust the nut with your other hand so you do not unhook the pendulum.
Maintenance
To maintain the clock you should have it checked and serviced every 4-5 years. Do not attempt to oil a clock yourself. This should be done by a qualified repairer. Over-oiling a clock can affect the running and condition of the clock.
To wind the clock use the enclosed key. Turn key clockwise until it stops (about 3 1/2 turns on the left winder and about 4 1/2 turns on centre and right winder. The centre winder is for the timekeeping, the right winder is for the quarter-hour chime, and the left winder is for the hour strike.
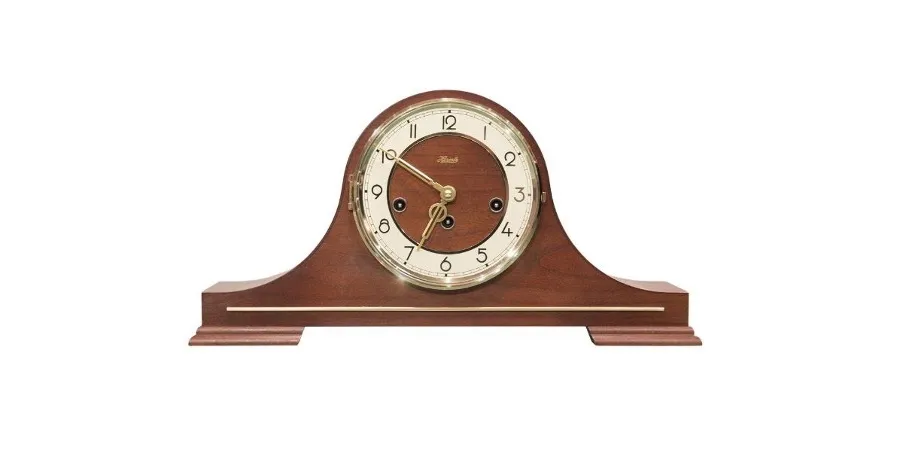
Chimes
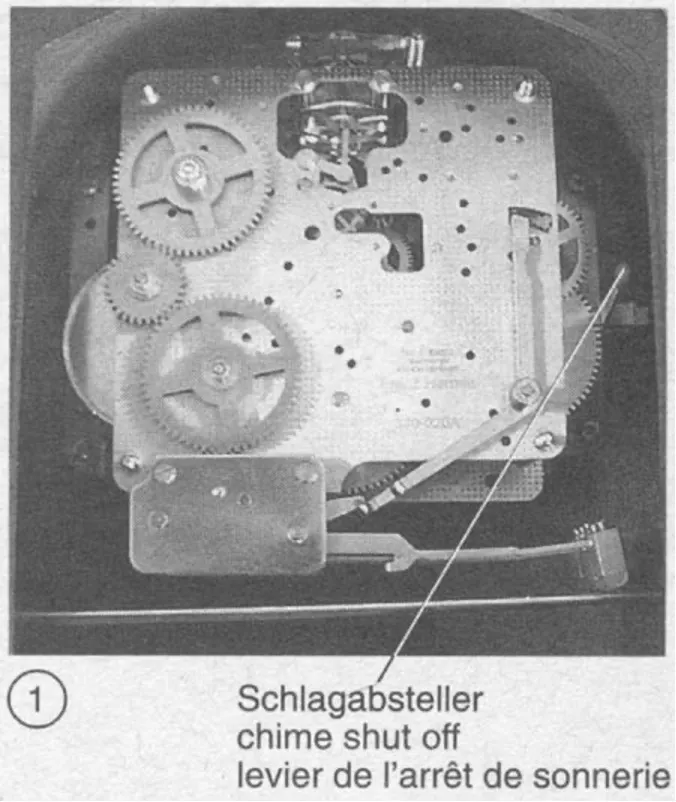
Your clock chimes the Westminster melody every 15 minutes. The chime shut-off is located inside the back of the clock case at the right side of the movement (see photo 1) with a red plastic bushing.
Lever up = chime
Lever down = silent
Setting the clock
The minute hand (long hand) may be moved clockwise or counterclockwise to set the clock to the correct time. Never turn the hour (short) hand, it moves automatically. After two hours the chimes will be automatically synchronized.
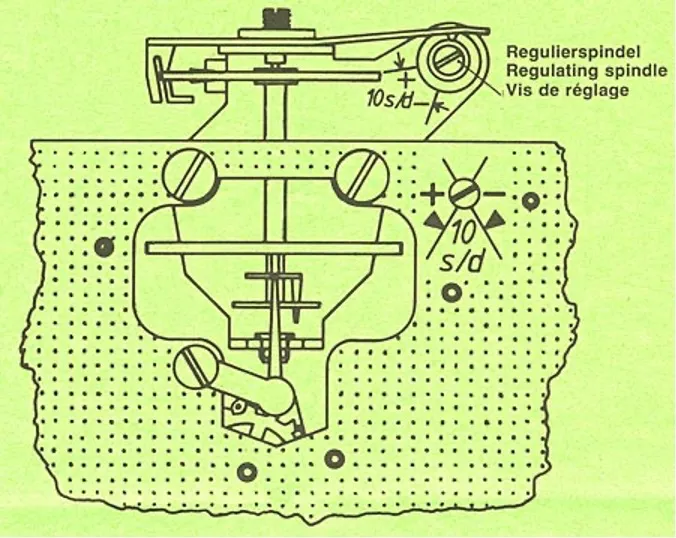
Regulating the clock
To make the clock go slower or faster, turn the regulating screw that is shown in the upper right of picture 3.
To make clock go slower: turn screw clockwise.
To make clock go faster: turn screw counterclockwise
Picture 1 showing location of chime shutoff lever for Westminster chime models
Sometimes the lever is through the dial and can be used from the front.
Picture 3 showing the regulator for adjusting the timekeeping. The screw at the very top right is turned with a screwdriver. Make only a small adjustment each time (about 1/16 of a turn).
Clockwise = slower
Counterclockwise = faster
the pendulum.
Maintenance
To maintain the clock you should have it checked and serviced every 4-5 years. Do not attempt to oil a clock yourself. This should be done by a qualified repairer. Over-oiling a clock can affect the running and condition of the clock.
Wind your clock fully every 7 days for optimum performance To wind the clock use the original key or a well fitting key. Turn the key clockwise gradually until it starts to resist then stop. The centre winder is for the timekeeping, the right winder is for the quarter-hour chime, and the left winder is for the hour strike.
Fitting the Pendulum
Hang the pendulum onto the pendulum leader (see image below).
Setting The Beat
Move the pendulum slightly to the left or right and release it gently. You should hear an even “tic – toc” sound. If the tick-tock is uneven or the clock stops, follow the “putting in beat” procedure. A clock may get out of beat during handling, moving or regulation. To put the clock in beat: Make sure the clock is hanging straight. Listen to the tick tock. Gently push the pendulum leader slightly past the point of resistance. Listen to the tick tock again. If it is more uneven, push the leader in the opposite direction and listen to the tick tock again. After several tries, you will be able to get the tick and tock sound to be evenly spaced, and the clock is then “in beat”.
Chime Setting and Time
The chime shut-off lever is located to the left of the numeral 9 usually. Turn the lever down if you want the clock to be silent.
The minute hand (long hand) must be moved clockwise to set the clock to the correct time. Never turn the hour (short) hand, it moves automatically. After two hours the chimes will be automatically synchronized.
If the clock is striking the wrong hour, move the hour hand (short hand) to point to the hour that the clock just struck whilst holding the minute hand still.
Regulation
To make the clock run slower – turn the regulating nut below the pendulum to the left.
To make the clock run faster – turn the regulating nut to the right.
One turn of the regulating nut changes the clock’s rate by approximately 1 minute per day. It is normal for a clock to run a few minutes fast or slow per week only one revolution of the nut in the appropriate direction and reset the hands to time each day until the clock is keeping adequate time.
Maintenance
To maintain the clock you should have it checked and serviced every 4-5 years. Do not attempt to oil a clock yourself. This should be done by a qualified repairer. Over-oiling a clock can affect the running and condition of the clock.
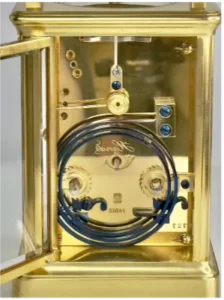
Atmos clock with the pendulum locked, generally the clock is locked with the lever below the dial, it is locked in right hand rotation so that when the clock is set up and the lever is released by pushing to the left the clock will start on its own. (There is also a transport lock underneath check this is unlocked before the lever under the dial). It should remain locked until you are ready to set the Atmos clock in its permanent place. Moving the Atmos clock without locking the pendulum can cause serious damage to the movement. The correct time to lock the pendulum is when it reaches an extreme swing, i.e. it stops moving. Do not lock the clock whilst the pendulum is in mid-rotation. The locking lever is quite stiff so push as gradual as you can whilst holding the clock steady.
Levelling the Atmos Clock
Atmos clocks are designed to work best when placed on a stable, level surface that does not suffer any jarring. Use the spirit level at the front of the base plate to level the Atmos clock. To level the clock the two feet at the front of the clock are raised up and down by the screws just inside the front case to assist with levelling the clock, adjust these until the bubble is completely central. If the clock will not level within the maximum adjustment of the screws, use a shim or packaging under the appropriate foot.
Setting the Time on the Atmos Clock
Set the clock to the correct time by using the minute hand only. It is best practice to move it in a clockwise direction and only when the pendulum is at, or about to reach, an extreme in its swing TO THE RIGHT, or is locked. Do not touch the hour hand or move the minute hand backwards on an Atmos clock. When the summer comes in the Spring to change the clocks for British Summer Time, just stop the clock with the lever, when the pendulum stops moving, and move the minute hand forward by an hour. In the Autumn it is easiest to just stop the clock and restart it after an hour has passed.
Starting the Atmos Clock
Once the Atmos clock has been levelled and the hands set, the locking mechanism can be undone. The pendulum should start to rotate and then keep oscillating backwards and forwards. It is best to set the hands a minute or two in advance before the door is put back in so that the lever can be released at the correct time. If the clock was stopped abruptly or accidentally jarred, do not spin the pendulum round by hand as this can damage the suspension spring and the escapement mechanism.
Timing Adjustments on the Atmos Clock
The Atmos clock is very sensitive and can react significantly to very minor adjustments. Allow the clock to settle for two weeks before making any adjustments then if the clock is running too fast or too slow, use the adjustment lever on the top of the frame which is just behind the dial at the twelve o clock position. Moving the lever TO THE RIGHT this speeds up the clock and turning the LEVER TO THE LEFT slows down the clock. The lever is marked A for advance (speed up) and R for retard (slow down). Move the lever JUST A MILLIMETER and wait at least a week for the clock to adjust then if necessary repeat. THE HANDS MUST BE SET TO TIME AFTER EACH ADJUSTMENT.
Cleaning and General Care for Your Atmos Clock
Keep the Atmos clock out of direct sunlight and avoid exposure to excessive hot or cold temperatures. The gold plating and lacquer on the case of the clock is very thin. Never use household cleaners or abrasives of any kind. Clean fingerprints and dust from the case with a very dilute, mild detergent and a soft, non abrasive cloth.
Summary
Level your clock as advised above, set your hands to time, then unlock the disc. With one hand on top of the case and release the leaver as slowly as you can till fully open.
Maintenance
To maintain the clock you should have it checked and serviced every 4-5 years. Do not attempt to oil a clock yourself. This should be done by a qualified repairer. Over-oiling a clock can affect the running and condition of the clock.